Thursday night we 'clapped for carers' and made as much noise as possible in the Thursday night tradition (the UK's way of saying thanks to all the care workers for all they are doing to keep everyone safe throughout this Corona-virus).


This inspired our craft idea for today and we made some NHS Superheroes but instead of the traditional hero capes, we decided they were also Angels and so their capes are Angel inspired 'wing-capes' instead :)


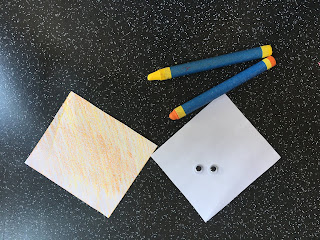
Things You Will Need

We had: various coloured paper, stapler (with staples loaded), cardboard tube, single and double-sided tape, scissors, crayons (for faces), felt tips (for eye colours), black pencil (for mouth), sandwich bag (for mask). We also show pegs and Gorilla glue (super glue) but these are an alternative option as we only needed to use the stapler and tape. If you do use glue, the pegs are to hold it together while drying as we have used this method previously.
The other items we didn't include in our photo as this was a design change we made later was the brighter blur paper which we used for our wings and a tiny dot of Pritt Stick. You can do the wings any way you like and use any colour you want - just remember to also have that ready and you can use any glue you want for the 'dot' as this is just to secure the eyes.
Instructions
Step 1

Firstly wrap your cardboard tube in coloured paper. We could get 2 x tubes on one piece of paper. Measure it using your tube and fold before you cut to make sure you have a straight edge and aren't cutting too short.

Once your tube is wrapped, secure in place at each end using the stapler.
Step 2

Colour in a piece of paper to make your 'face'. This can be any colours you have. We had yellow and orange so that is what we used! If you have googly eyes you can have these at the ready although we preferred our own home made ones as you will see below.
Step 3

Take a piece of paper you want to use for the top of the superhero mask and draw the above. You may need a few attempts as it needs to be longer than you think as it is covering the hero's eyes as opposed to sitting above them.
Step 4

Cut out the mask and stick two small pieces of double-sided tape on. If you have scribbles or bits you don't want visible, stick the tape to this side as this will be hidden when you stick it on later.
Step 5
At this point we made the wings and eyes as well so we had everything ready to be put together. You don't have to follow this order, but we found this easiest for us.

To make eyes, fold over your piece of paper and cut an almond shape. We cut one side to a point and then cut from the edge inwards to make the other side of the almond. By folding the paper you will be cutting two eyes at once and therefore they will be exactly the same size. The eyes are tiny, so because this is fiddly, we found this the easiest way to make sure our eyes were identical.
Once you have your eyes, draw a coloured dot in the centre as their eye colour.

To make the wings, we folded card to make a centre line and cut a curved edge. When it opens up it looks a bit like a heart.
Step 6

We attached the wings to the back of the tube (where the join line is) with the stapler. We then placed double-sided tape on the back of the face and stuck this on and then stuck the hero mask on top.
Step 7

Because we wanted our heroes to be NHS, we loosely copied the NHS writing style and stuck this onto some pale yellow paper which we stuck on using double-sided tape. We also used a tiny dot of glue to secure the eyes - note the position of these - it's so tempting to place them on the face - which is fine but we we wanted the eyes to be 'peaking through' so the hero mask was exactly that as opposed to a 'hat'.
We also decided to add some rouged cheeks and so we used a red felt tip to add this detail to the face, along with the black pen to make the mouth. We also chose to stick some cut out sandwich bag over the top to represent the current Covid-19 protective masks. We used double-sided tape at each edge to secure.
Step 8


We did this really as a bit of fun and these could be just ornamental or as a token reminder of the pandemic. However they can also be put to use as pen pots / paintbrush holders etc. They aren't the most stable so nothing heavy, or you could make them more sturdy by adding a base.

This same model can be adapted to make a range of superheroes - we also had a go at Batman :)
There are so may options with this. Have fun and feel free to post your makes in the comments below :)
WM x
Comments
Post a Comment